
Lets start at the very beginning…a very good place to start…when you read you begin with A-B-C…when you sew you begin with…well…fabric.
Clearly I’m in a Sound of Music phase. And clearly, rhyming isn’t my strong suit.
Nonetheless, we’ve gotten here.
Fabric is usually where I get my jolts of inspiration from. I see material, and more often than not, I instantly have an idea or vision of what I’d like to make out of it. If I buy a piece of fabric just because I like it, I wait for inspiration to strike. I try not to force it. I have a drawer full of fabrics my darling mumsie brought for me from India, but since I didn’t have that moment in the store of seeing it and being struck with an idea, I’m waiting.
The skirt that follows is one of those ideas that struck me almost instantly, although the fabric is not store bought. I acquired it for free from the staging department of an events company I worked for. I was always amazed at how much fabric was either thrown away after an event, or just lying in rolls fading and dusty, just aching to be turned into something greater than itself.
One of the senior staging guys noticed that I often salvaged barely used fabric from events- I could not STAND seeing it discarded. He pointed me to the rolls and rolls of unused fabric in different colours and offered me whatever I wanted, since they would EVENTUALLY throw them out – colours aren’t often used for staging. Its usually black or white for the kind of gigs we did.
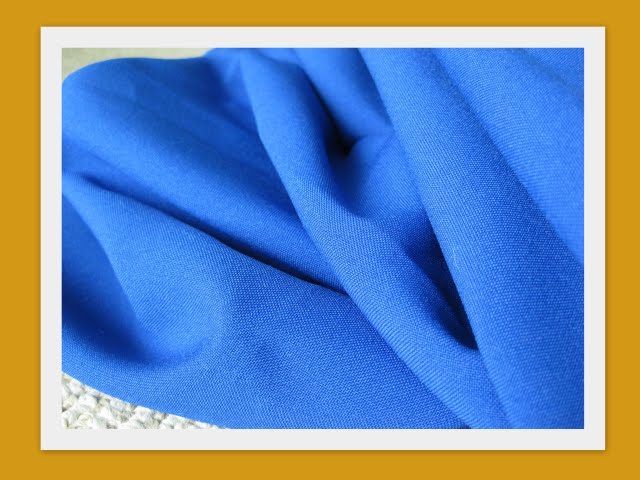
So I picked this gorgeous cobalt blue fabric that just happens to be suiting quality gaberdine.
 |
| From Sew What |
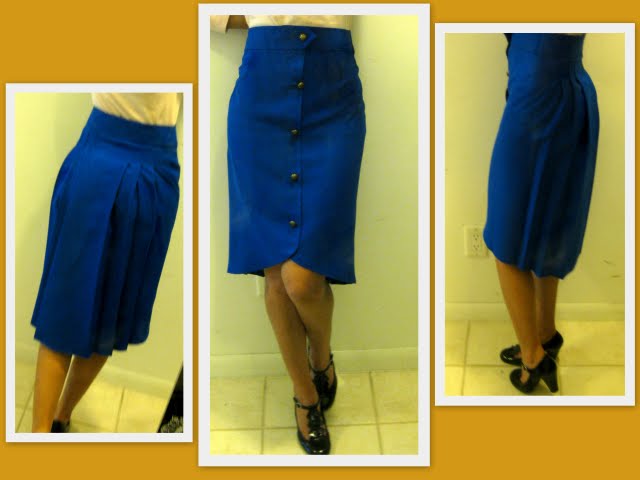
From the way it flowed I knew I wanted to make a much fantasied asymmetrical skirt, longer in the back, shorter in the front and pleated on the back for extra effect.
I started by deciding how long I wanted it to be at its longest, and how short I wanted it to be, at its shortest.
I cut the fabric to the longest length and then drew a straight line to the shortest point on the selvage. I then marked some points, interpolating between the shortest and longest marks and drew a curve and cut this on the fold.
 |
| From Sew What |
I curved the edges on each side and this is what the whole piece looked like:
 |
| From Sew What |
I then zig zag edged all of it, and then hemmed it all. I should mention here that I had previously marked and measured the back pleats, added sewing allowances and such, and only then cut the fabric. This didn’t stop it from still coming out some what wonky, but we’ll pretend I intended it to be this way.
I knew I wanted it to be a front closure and left enough allowances accordingly, though I made a lot of it up as I went along.
Since the whole piece was curved I took great care to mark out and pin the hem before sewing.
 |
| From Sew What |
Once it was hemmed I folded and pinned my pleats and hand tacked them down about 3 inches from the top for some definition. I later finalised this with top stitching.
 |
| From Sew What |
I had left one inch allowances on each side, or rather, the front seam of the skirt. I pinned and hand basted the seam accordingly and sewed two darts on either side of the front seam, to help shape the front. These were also finalised by stitching from the widest part of the dart to the point and making sure to tie off the loose thread. Darts will and do unravel. I then pressed them outwards.
 |
| From Sew What |
I then ironed on some fusible interfacing to the front seam edges and the waist band piece. This is where it starts to go downhill.
 |
| From Sew What |
I then moved on to attaching the waist band.
Once again this proved to be my Achilles heel. At the time though, I naively believed my unnatural proportions would fit a straight waist band and cut out a 6 inch strip and, as shown above, interfaced it. This too would prove to be a blunder, as interfaced fabric is REALLY difficult to mess around with after the fact. Also, I should have interfaced only HALF the width. I interfaced it all and hence once it was folded over, it was ridiculous. TWO layers of interfaced fabric might as well be a quilt.
I basted and sewed on the waist band as per usual and since I was going for a 50’s/80’s revival look, I made an arrow shaped tab at the end of the band and used the buttonhole function on the machine to make a horizontal button hole.
 |
| From Sew What |
I then finalised button placement and while I managed to do the top button perfectly, the second button hole landed up being horizontal instead of vertical, something I cannot fix and sorely regret.
I tried getting over that and the rest of the front seam was sewed shut, with buttons being placed on top – basically a false button placate.
What I couldn’t get over however, was the fact that once again despite measuring and hand basting and meticulously pinning everything, the waist band stuck straight up. AGAIN!
I just didn’t understand it and still don’t to a certain degree. I reached out to my sewing community and basically, my suspicions are confirmed.
I am a mutant.
Also, and probably more reasonably, I have a larger than normal difference between my waist and hips and for any waist band to fit properly, I will most likely have to cut it curved – smaller at the top and wider at the bottom. THUNDERING TYPHOONS!!
The skirt though…its gorgeous and perfect and I just didn’t have the heart to rip off the waist band and start over.
After much hemming and hawing (HAW!), ripping off and re-positioning buttons, whining, fuming, re-positioning buttons some more, talking to mum, talking to burdastyle members, vacillating back and forth in my head and writing half this blog post, I decided not to rip off the band.
I made my usual darts on the side and luckily, since there are already darts in the skirt, it doesn’t look half bad.
 |
| From Sew What |
Mistakes? I’ve made a few…I’ve had my share of sand kicked in my face…but I’ve come through.
The sides that come around my hips pull a little too much…the pleats are just not deep enough and I cannot even begin to understand why I did that. I measured and pinned and did everything right but all I can put it down to is haste.
I will make this one again. It’s too nice a design to leave without fulfilling it’s potential in entirety.
For now, I will wear it still, with a crisp cotton shirt and exposed seam stockings as soon as it’s more spring than winter, somewhere in the 1950’s.

oh WOWOWOWOWOW THIS GORGEOUS—WWWWWOOOOOWWWW!
I think I want to try this. Sophistcate sexy skirt!
Thanks!
If you do try it, I suggest making the pleats full and deep and leaving more than enough fabric to come around the hips. Good luck and do send me links to pictures when you’re done! 🙂
sooo pretty!